
Breakfast & Brunch
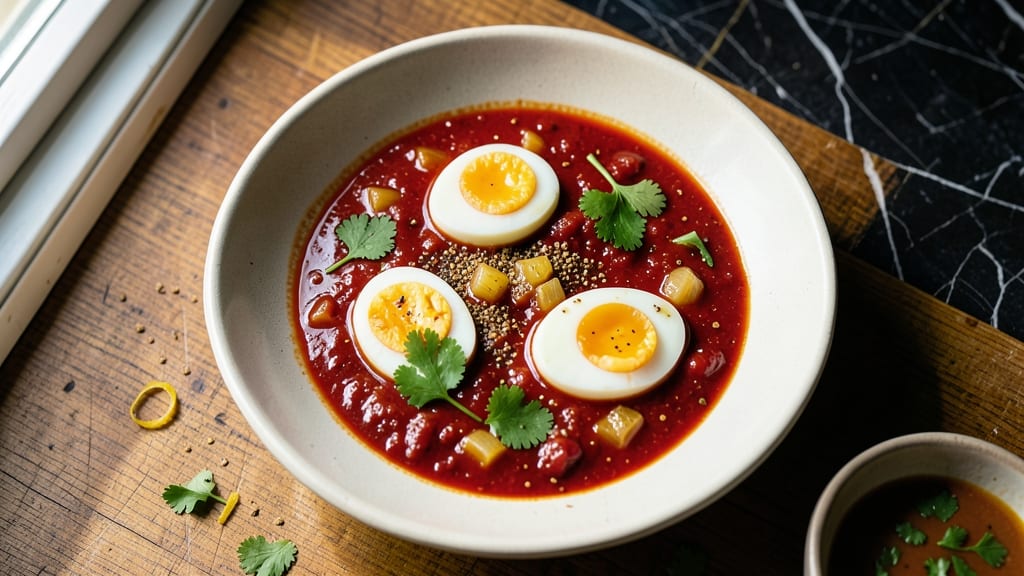
This tomato boiled egg curry recipe transforms simple ingredients into a creamy, spiced masterpiece where tender eggs melt into rich tomato gravy. 🌟 The secret lies in simmering hard-boiled eggs directly in the curry until their yolks soften into velvety pockets of flavor—no extra steps, just one-pot magic.
Perfect for vegetarian breakfasts or lazy weeknight dinners, this dish balances tangy tomatoes with aromatic spices for a restaurant-quality result at home.
The beauty of this recipe is its simplicity: just a handful of pantry staples and 30 minutes of active time. Tomato puree forms the base, while cumin, coriander, and garam masala build layers of warmth.
The eggs cook gently in the simmering sauce, absorbing flavors until their yolks become luscious and creamy—no need for heavy cream or complicated techniques. This is comfort food elevated, where every spoonful delivers both texture and depth.
What you’ll end up with is a vibrant, one-pot curry where perfectly cooked eggs nestle in a glossy tomato gravy, their softened yolks adding natural richness. The spices infuse the dish with earthy warmth, while the tomatoes provide a bright, tangy contrast.
It’s hearty enough to stand alone or pair beautifully with steamed rice or crusty bread—ideal for feeding a crowd or meal prepping for the week.
For those who love customization, adjust the spice level with green chilies or cayenne, or swap in coconut milk for extra creaminess. The method remains the same: simmer, soften, and savor. This isn’t just another egg curry—it’s a foolproof way to turn humble ingredients into something extraordinary. Let’s get cooking!
Ingredients for tomato boiled egg curry
Pantry staples meet aromatic spices for this velvety tomato egg curry masterpiece.
| Ingredient | Amount | Notes |
|---|---|---|
| Large Eggs 🥚 | 8 whole | Hard-boiled for 10 minutes |
| Tomato Puree 🍅 | 1 ½ cups | Canned or homemade preferred |
| Yellow Onions 🧅 | 1 medium | Finely chopped, about 1 cup |
| Fresh Ginger 🌿 | 2 tbsp | Grated, about 1-inch piece |
| Garlic Cloves 🧄 | 4 cloves | Minced, about 1 tbsp |
| Ground Cumin 🌶️ | 1 tsp | Toasted for deeper flavor |
| Ground Coriander 🌿 | 1 ½ tsp | Freshly ground preferred |
| Garam Masala 🌶️ | 1 tsp | Store-bought blend works |
| Turmeric Powder 🧂 | ½ tsp | Bright yellow color indicator |
| Red Chili Powder 🌶️ | ½ tsp | Adjust for heat preference |
| Salt 🧂 | 1 tsp | Kosher or sea salt preferred |
| Coconut Milk 🥥 | ½ cup | Full-fat for creaminess |
| Water 💧 | ½ cup | Room temperature preferred |
| Fresh Cilantro 🌿 | ¼ cup | Chopped, for garnish |
| Extra-Virgin Olive Oil 🫒 | 2 tbsp | For sautéing onions |
The eggs are the star—large eggs work best for their rich yolks. For optimal texture, boil them for exactly 10 minutes before adding to the curry. Trader Joe's or Whole Foods carry high-quality eggs with vibrant yolks. The tomato puree should be unsweetened—check labels for added sugar. Fresh ginger and garlic elevate the dish; Penzeys Spices offers excellent pre-grated ginger if you prefer convenience. Toast your spices in a dry pan for 30 seconds to deepen their flavors—it's worth the extra minute.
No tomato puree? Crushed tomatoes or fresh diced tomatoes work in a pinch, but you'll need about 1.5 cups total. Substitute coconut milk with heavy cream for a richer texture, though the dish remains vegetarian. Fresh cilantro is ideal, but dried cilantro or parsley at half the amount works if needed. For extra heat, add fresh green chilies or cayenne powder. The garam masala blend can be tricky to find—MDH or Everest brands are widely available and reliable. Adjust the red chili powder to taste, especially if you're sensitive to spice.
This curry reheats beautifully—simmer gently on the stove for 5-10 minutes to restore its creaminess. Store in an airtight container in the fridge for up to 5 days, or freeze for 3 months. The eggs soften further upon reheating, so plan accordingly. For meal prep, portion into individual containers with a side of rice. Garnish with extra cilantro and a drizzle of coconut milk before serving to highlight the vibrant colors and textures.
Why You'll Love This Recipe
- Here’s what sold me: the eggs. Soft-boiled just enough to stay intact, then simmered in the curry until the yolks are almost set—creamy but still firm. That crispy edge with the runny center? Chef’s kiss. And the sauce? Rich, slightly sweet from the tomato puree, with just enough heat to make it addictive.
- I’ll be real: this recipe costs me pennies. A dozen eggs, a few onions, and a jar of tomato puree stretch forever. No specialty items, no waste—just pure, flavorful leftovers. Plus, it’s the kind of dish that tastes better the next day, so I rarely end up throwing anything away. My wallet thanks me every time.
Step-by-step instructions for tomato boiled egg curry
Master this one-pot technique for velvety egg yolks and aromatic spice layers.
🍳 Step 1: Sauté Aromatics Until Fragrant
Heat the 2 tablespoons extra-virgin olive oil in a heavy-bottomed pot over medium heat. Add the finely chopped yellow onions and cook for 5-6 minutes until translucent and slightly caramelized at the edges. This foundational step develops sweetness that balances the curry's acidity.
Add the grated fresh ginger and minced garlic cloves, stirring constantly for 30 seconds until fragrant. You'll know it's ready when the kitchen fills with that pungent, warm aroma—this is where the curry's soul begins to form. If the garlic starts to brown too quickly, reduce heat to medium-low to prevent burning.
👨🍳 Step 2: Toast Spices for Depth of Flavor
Add all the dry spices: 1 teaspoon ground cumin, 1.5 teaspoons ground coriander, 0.5 teaspoon turmeric powder, 0.5 teaspoon red chili powder, and 1 teaspoon salt. Stir vigorously for 1-2 minutes until the spices release their essential oils and the mixture smells intensely aromatic. You'll see the spices darken slightly—this indicates proper toasting.
I press down gently with a wooden spoon during this process to ensure even distribution. This step is critical for developing complex flavor layers that simple blending can't replicate. Watch the color closely—if it darkens too quickly, remove from heat momentarily to prevent bitterness.
🥘 Step 3: Build the Tomato Base
Pour in the 1.5 cups tomato puree and 0.5 cup water, stirring to combine with the spice mixture. Bring to a gentle simmer over medium heat and cook uncovered for 10-12 minutes, stirring occasionally, until the mixture thickens slightly and the raw tomato flavor mellows into a rich, sweet base.
Here's where the magic happens: the acidity in the tomato puree begins to break down, creating a smoother foundation. You'll notice the sauce reduce by about 25%—this concentration intensifies the flavors. If the mixture sticks to the pot, add a splash of water to maintain proper consistency.
🍳 Step 4: Incorporate Coconut Milk and Hard-Boiled Eggs
Stir in the 0.5 cup coconut milk and 1 teaspoon garam masala, then reduce heat to low. Gently add the 8 hard-boiled eggs (peeled) to the simmering sauce. The gentle heat will begin to warm the eggs, allowing their flavors to infuse while keeping the yolks intact. Simmer for 5-7 minutes, stirring gently to prevent the eggs from breaking.
Real talk: don't rush this step. The gentle heat is crucial for creating that signature creamy texture without scrambling the yolks. You'll see the sauce turn a rich, golden color as it absorbs the egg's natural oils. If the sauce looks too thick, add 1-2 tablespoons water to maintain proper consistency.
🔪 Step 5: Finish and Garnish
Remove from heat and stir in the chopped fresh cilantro. Let the curry rest for 5 minutes to allow all the flavors to meld together. The resting period is essential—it lets the spices settle and the sauce develop its final texture. You'll notice the aroma deepen as the curry comes to its full flavor potential.
Serve immediately with steamed basmati rice or warm naan bread. Each spoonful should deliver a harmonious balance of creamy egg yolks, aromatic spices, and tangy tomato base. The eggs should be warm but still firm, with just a hint of creaminess from their absorbed flavors.
Pro Tips For Making Tomato Boiled Egg Curry
- COOK EGGS UNTIL JUST SET: I learned this the hard way—overcooked eggs in curry turn rubbery. Simmer them in the sauce for 6-7 minutes max, stirring occasionally, until the whites are fully set but yolks stay runny. A toothpick test works: it should slide in cleanly but not pull out liquid.
- GINGER-GARLIC TOAST FIRST: Skip the raw hit of fresh ginger and garlic by toasting them in oil for 30 seconds until fragrant. This softens their bite and deepens the flavor—no more chewing through raw chunks or ending up with a dish that tastes like medicine.
- SALT THE TOMATO PUREE EARLY: Add half the salt when you first add the tomato puree to the pan. It mellows the acidity and lets the flavors meld better. I used to wait until the end, and the curry always tasted sharp and unfinished.
- USE ONIONS IN TWO STAGES: Fry half the onions until deep golden, then set them aside. Add the rest later with the ginger and garlic—they’ll caramelize further as the curry cooks, giving you layers of sweetness and depth. (Yes, it’s extra work, but the flavor is worth it.)
Storing and reheating this dish
Refrigerator Storage
Let your curry cool to room temperature first—this takes about 30-45 minutes. Then transfer to an airtight glass container with a tight-sealing lid. Store in the fridge for up to 5 days, though I find the flavors actually deepen after 2 days as the spices meld.
The eggs will soften further but remain safe to eat—just heat gently before serving. 💛
Freezer Preparation
For long-term storage, portion the curry into freezer-safe glass containers or heavy-duty plastic bags, leaving 1-inch headspace for expansion. Seal tightly to prevent freezer burn and label with the date.
This curry freezes beautifully for up to 3 months, though I recommend eating it within 2 months for best texture. The coconut milk may separate slightly when thawed—just stir vigorously to restore creaminess.
Stovetop Reheating
My preferred method is gentle reheating on the stovetop. Transfer the curry to a pot and heat over low-medium heat for 8-10 minutes, stirring occasionally. Add 1-2 tablespoons water or coconut milk if the sauce thickens too much.
The eggs should warm through completely—probe with a fork to check. This method preserves the creamy texture better than microwave reheating. ✨
Microwave Method
For quick reheating, transfer a portion to a microwave-safe dish and cover loosely with a damp paper towel. Heat on medium power (50%) for 2-3 minutes, stirring halfway. The eggs may become slightly rubbery if overcooked, so check at 1-minute intervals.
Add a splash of water if the curry appears dry. This works best for single servings rather than the whole pot.
Serving After Reheating
Always garnish freshly after reheating to brighten the dish. Add a sprinkle of fresh cilantro, a drizzle of extra-virgin olive oil, and a pinch of salt to restore freshness. Serve immediately with steamed basmati rice or warm naan to soak up the creamy sauce.
The eggs will be slightly softer than when first made, but this actually enhances their creamy texture when mixed with the sauce. 🍚
Meal Prep Tips
For efficient meal prep, store individual portions in small glass containers with a side of rice in separate compartments. Reheat just the curry portion and serve with fresh rice. I like to make a double batch on Sundays—one for immediate serving and one for freezing.
The curry reheats beautifully for 3-4 servings**, making it perfect for busy weeknights. Always taste and adjust seasoning after reheating, as flavors can concentrate differently. 📅
Nutrition facts
Frequently asked questions
Why do the eggs need to be hard-boiled before adding to the curry?
Hard-boiling ensures the eggs cook evenly and don't scramble in the sauce. The gentle simmer later softens the yolks just enough for that creamy texture without turning the whites rubbery. Pro tip: Boil them for exactly 10 minutes to get perfect doneness before adding to the curry.
Can I make this curry without coconut milk?
Yes! The coconut milk adds creaminess, but you can substitute ½ cup heavy cream or ½ cup Greek yogurt (thinned with water) for a similar texture. Just reduce the water slightly to maintain balance. The dish will still be delicious—it's all about the tomato-spice base and eggs!
How do I adjust the spice level for kids or sensitive eaters?
Start by reducing the red chili powder to ¼ teaspoon or omit it completely. For extra mildness, add ½ teaspoon sugar to balance acidity. You can also strain the sauce through a fine mesh sieve to remove visible spices while keeping the flavor. The eggs will still be delicious with minimal heat!
What's the secret to getting perfectly creamy egg yolks?
Simmer the eggs gently on low heat for 5-7 minutes after adding them to the curry. The sauce should be at a bare simmer—not boiling—to prevent the yolks from breaking. The coconut milk and tomato base help emulsify the egg oils naturally for that velvety texture.
Can I use fresh tomatoes instead of tomato puree?
For 1.5 cups fresh tomatoes, peel, seed, and finely chop them before cooking. You'll need to simmer them longer (15-20 minutes) to break down their texture and reduce the sauce. Fresh tomatoes add a brighter acidity that works beautifully—just be prepared for more active cooking time.