
Breakfast & Brunch
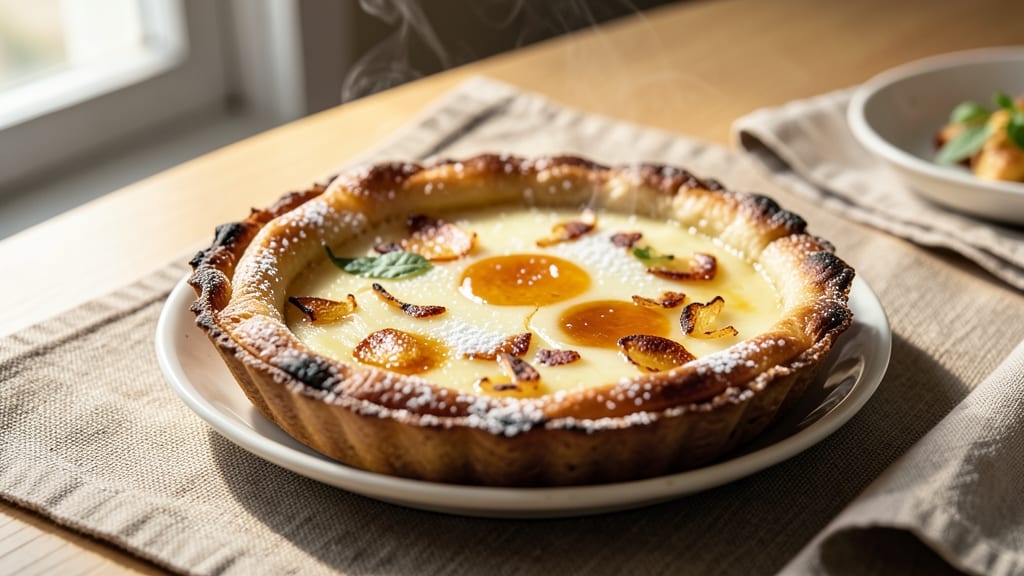
This traditional egg tart recipe delivers the perfect balance of flaky pastry and silky custard that's become a beloved staple across cultures. 🌟 The secret lies in a delicate egg yolk custard that transforms from runny to golden perfection while encased in a buttery, crisp shell—just like the ones you'd find in Hong Kong bakeries or Portuguese pastelarias.
What sets these apart is the technique: a well-chilled dough wrapped around a custard mixture that bakes to a tender yet sturdy crust, while the custard inside remains velvety smooth.
The difference between a good egg tart and a great one often comes down to proper custard temperature and baking precision—both of which we'll cover in detail to ensure your first attempt is flawless.
By the time you pull these from the oven, you'll have golden, crackly shells hugging rich custard centers that cut cleanly with each bite. The aroma alone will transport you to bustling Asian street markets, where warm egg tarts are paired with sweet tea—a combination that makes them irresistible.
Whether you prefer the slightly sweeter Portuguese version or the classic Hong Kong style, this recipe adapts beautifully while maintaining the core elements that make egg tarts universally loved. Perfect for breakfast, dessert, or anytime you crave something comforting yet elegant.
Ingredients for traditional egg tart
Six simple ingredients create the perfect flaky crust and velvety custard for egg tarts.
| Ingredient | Amount | Notes |
|---|---|---|
| All-Purpose Flour 🌾 | 3 cups | Sifted for light texture |
| Unsalted Butter 🧈 | 1 cup | Cold, cubed for flaky layers |
| Large Eggs 🥚 | 1 whole | Room temperature for custard |
| Granulated Sugar 🍚 | ½ cup | Fine grain preferred |
| Milk 🥛 | ½ cup | Whole milk for richness |
| Egg Yolks 🥚 | 4 whole | Separated from whites |
| Salt 🧂 | ½ tsp | Fine sea salt preferred |
| Vanilla Extract 🌸 | ½ tsp | Pure vanilla for flavor |
| Baking Powder 🍞 | ½ tsp | For slight lift |
| Ice Water 💧 | ¼ cup | For dough consistency |
| Cornstarch 🌾 | 1 tbsp | For custard smoothness |
The butter is non-negotiable here—European-style unsalted butter like Plugrá or Land O’Lakes works best for that rich, flaky texture. Grab it from the deli section if your store has it, or the regular grocery aisle will do. For the custard, fresh egg yolks are essential—no powdered substitutes. If you're making a big batch, room-temperature eggs blend smoother. The vanilla extract should be pure, not imitation—Trader Joe's or Williams Sonoma carry good options. And don’t skip sifting the flour; it makes all the difference in that crisp shell.
No vanilla extract? Vanilla bean paste at half the amount works in a pinch, or a pinch of ground vanilla bean. Short on butter? Coconut oil works but changes the flavor slightly. For the custard, if you accidentally add whole eggs, strain it afterward to keep it silky. The milk can be swapped for half-and-half for extra richness. And if you’re feeling fancy, add a pinch of cinnamon to the dough for a Portuguese twist. The cornstarch is key—it keeps the custard from getting gluey, so don’t skip it.
The dough keeps 2 days wrapped in plastic in the fridge, but it’s best used fresh. The custard? 24 hours max—it thickens as it sits. For the perfect texture, chill the dough 30 minutes before rolling. These reheat beautifully—just 5 minutes at 350°F to restore that crackly crust. Store leftovers in an airtight container, but honestly? They’re best fresh out of the oven.
Why You'll Love This Recipe
- Pantry-Friendly Magic: I swear by this recipe when I forget to buy special ingredients—just flour, butter, eggs, and milk. The crust comes together with a simple mix and press, no fancy rolling required, and the custard? Pure silkiness with just those five things.
- Golden Crust, Creamy Heart: That first bite—crispy, buttery crust giving way to a custard so rich it makes me pause. Sugar caramelizes just enough at the edges to add a subtle sweetness, while the eggs keep it velvety. Honestly, it’s the kind of balance that makes me reach for seconds without guilt.
- Breakfast or Dessert: I’ve served these at brunch with coffee, packed them in lunchboxes for my kids, and even turned them into a dessert with a sprinkle of cinnamon. The versatility is real—no need to reinvent the wheel, just adjust the timing or toppings.
- Make-Ahead Masterpiece: Between us, I’ve never had egg tarts last past day two in my house. But that’s the beauty—bake a batch on Sunday, and you’ve got effortless snacks, quick breakfasts, or even a grab-and-go treat for the week. Plus, the cost? A fraction of store-bought pastries.
Step-by-step instructions for traditional egg tarts
Here's how to create those iconic flaky shells filled with silky custard—just like Hong Kong's best.
👨🍳 Step 1: Make the Flaky Pastry Dough
In a large bowl, combine the 3 cups All-Purpose Flour and 0.5 tsp Salt. Cut in the 1 cup Unsalted Butter using a pastry cutter or your fingers until the mixture resembles coarse crumbs with pea-sized butter pieces. This texture is key for flaky layers.
Add the 1 whole Large Eggs and 0.25 cup Ice Water gradually while mixing just until the dough comes together. Don't overwork it—press gently until it forms a smooth ball. Wrap tightly in plastic and chill for 30 minutes. This resting period relaxes the gluten for perfect flakiness.
🍳 Step 2: Prepare the Silky Custard Filling
In a medium bowl, whisk together the 4 whole Egg Yolks, 0.5 cup Granulated Sugar, and 0.5 tsp Vanilla Extract until smooth. In a separate bowl, warm the 0.5 cup Milk until steaming but not boiling. Slowly whisk the warm milk into the yolk mixture while continuing to stir.
Return the mixture to the warm (not hot) pan and cook on low heat, stirring constantly with a wooden spoon, until it thickens enough to coat the back of the spoon (10-12 minutes). This is your custard base. Remove from heat and stir in the 0.5 tsp Baking Powder and 1 tbsp Cornstarch to create that signature glossy finish. Let cool slightly—it should be thick but still pourable.
🥘 Step 3: Assemble and Bake the Tarts
Preheat your oven to 375°F. On a lightly floured surface, roll out about ⅓ of the chilled dough to ⅛-inch thickness. Cut into 6-inch circles using a round cutter or plate. Press each circle into a greased mini tart pan, trimming any excess dough.
Fill each shell ¾ full with the warm custard mixture. Bake for 18-22 minutes until the edges are golden brown and the custard is set but still slightly jiggly in the center. The top should be puffed with a crackly crust—this is your visual cue for perfect doneness.
⏰ Step 4: Finish and Serve Warm
Remove the tarts from the oven and let them cool for 5 minutes in the pan. This resting period prevents the custard from running out when you unmold. Run a small knife around the edges to loosen, then invert each tart onto a serving plate.
Serve immediately while the custard is still warm and silky. The contrast between the crisp, flaky pastry and the creamy custard is what makes these tarts legendary. For extra authenticity, dust with powdered sugar just before serving—though purists will argue it's not traditional!
Pro Tips For Making Traditional Egg Tart
- CHILL THE BUTTER FIRST: Cold butter in the crust mix makes all the difference—literally. Cut that unsalted butter into tiny pea-sized pieces and refrigerate the dough for 30 minutes before rolling. I learned this the hard way when my first attempt turned into a greasy mess that wouldn’t hold shape.
- USE A LITTLE LESS SUGAR: Traditional egg tarts aren’t dessert—skip the extra sugar in the custard. The natural sweetness of the eggs and milk is enough; 2 tablespoons max is plenty. I was skeptical until I tried it—no cloying sweetness, just pure custard flavor.
- DON’T OVERMIX THE DOUGH: The moment your flour-butter mix starts looking like wet sand, stop. Overworking it develops gluten, and your crust will turn tough instead of flaky. Just mix until it resembles coarse crumbs—yes, it’ll look weird, but it works every time.
- BAKE THE CRUST ALONE: Blind-bake the tart shells for 8-10 minutes at 375°F (190°C) before adding the custard. This prevents soggy bottoms and ensures the crust sets properly. I skip this when I’m lazy, but the difference in texture is noticeable—crispy vs. gummy.
Serving suggestions for traditional egg tart
Tea Pairings
Warm egg tarts are a match made in heaven with jasmine tea—its delicate floral notes complement the custard's richness without overpowering it. I always keep a pot of Lipton Jasmine Tea brewing when I make these, as its subtle sweetness enhances the egg tart's natural flavors.
For something bolder, try Earl Grey—the bergamot adds a citrusy contrast that cuts through the custard's creaminess. 🍵
Breakfast Spread
Turn your egg tarts into a full breakfast by pairing them with crispy bacon and a side of scrambled eggs. The salty-sweet contrast is unbeatable. For a vegetarian option, add avocado slices and a sprinkle of flaky sea salt—the creamy avocado balances the tart's richness beautifully.
I love serving this spread with a small bowl of homemade jam for dipping.
Dessert Presentation
For a dessert-style presentation, arrange the egg tarts on a wooden board with a dusting of powdered sugar and a few fresh mint leaves for color. Serve with vanilla ice cream on the side for scooping into the warm custard.
This setup feels elegant yet casual—perfect for brunch gatherings or afternoon treats. 🌿
Coffee Contrast
While tea is traditional, a strong cup of coffee works surprisingly well with egg tarts. The bitterness of dark roast or espresso helps cleanse your palate between bites. I recommend Starbucks Pike Place Roast—its medium-dark profile balances the custard's sweetness without competing.
For a dessert twist, try a cold brew with a splash of oat milk for a refreshing contrast.
Fruit Accompaniment
Fresh fruit adds a bright, refreshing element to your egg tart experience. Sliced mango or pineapple introduces tropical sweetness that pairs wonderfully with the custard. I often serve mandarin orange segments alongside for their juicy acidity.
This combo works especially well during summer months when fruit is at its peak. 🍍
Garnish Ideas
Elevate your presentation with simple garnishes. A sprinkle of toasted coconut flakes adds texture and a tropical vibe. For something more elegant, drizzle with gold leaf or a swirl of honey.
If you prefer savory notes, a pinch of flaky salt or smoked paprika on top adds an unexpected depth. These finishing touches make even homemade tarts feel special. ✨
Nutrition facts
Frequently asked questions
Why does my egg tart custard look grainy instead of silky?
Grainy custard usually means the mixture was cooked too fast or stirred too vigorously. Always cook the custard on low heat and stir constantly with a wooden spoon—this creates tiny air bubbles that make the texture smooth. Also, make sure your egg yolks and sugar are fully dissolved before adding the milk. If it's already grainy, strain it through a fine-mesh sieve before filling the shells.
Can I make egg tarts without a tart pan?
Use 6-inch round cake pans or even individual ramekins for single-serving tarts. Grease them well and press the dough firmly into the bottom and up the sides. For a rustic look, bake on a parchment-lined sheet and cut into wedges after baking. Just reduce baking time by 2-3 minutes since they'll cook faster without metal pans.
What's the difference between Hong Kong and Portuguese egg tarts?
Hong Kong-style tarts have a slightly thicker, crackly crust with a more custard-forward flavor, while Portuguese versions (pastéis de nata) are sweeter with a softer crust and often include cinnamon in the dough. The custard in Portuguese tarts is also slightly richer, sometimes with a touch of cornstarch for extra gloss. Both are delicious—choose based on your texture preference!
How do I fix a soggy bottom in my egg tarts?
Soggy bottoms happen when the custard is too wet or the dough isn't fully baked. To prevent this: 1) Chill your dough longer (1 hour instead of 30 minutes); 2) Pre-bake the shells for 5 minutes at 375°F before adding custard; 3) Ensure your custard is fully set (it should jiggle slightly but not be runny). For already-baked tarts, slice horizontally and layer with a thin custard mixture to refresh the texture.
Can I make egg tarts ahead of time?
Fresh is best, but you can prep components in advance! The dough keeps 2 days in the fridge, and the custard can be made 24 hours ahead—just reheat gently before using. For fully assembled tarts, bake them 1 day ahead and store at room temperature. Reheat in a 350°F oven for 5-7 minutes to restore that crackly crust. The custard will firm up slightly but still taste delicious.